How to Audit Your Gaming Spending in 30 Minutes
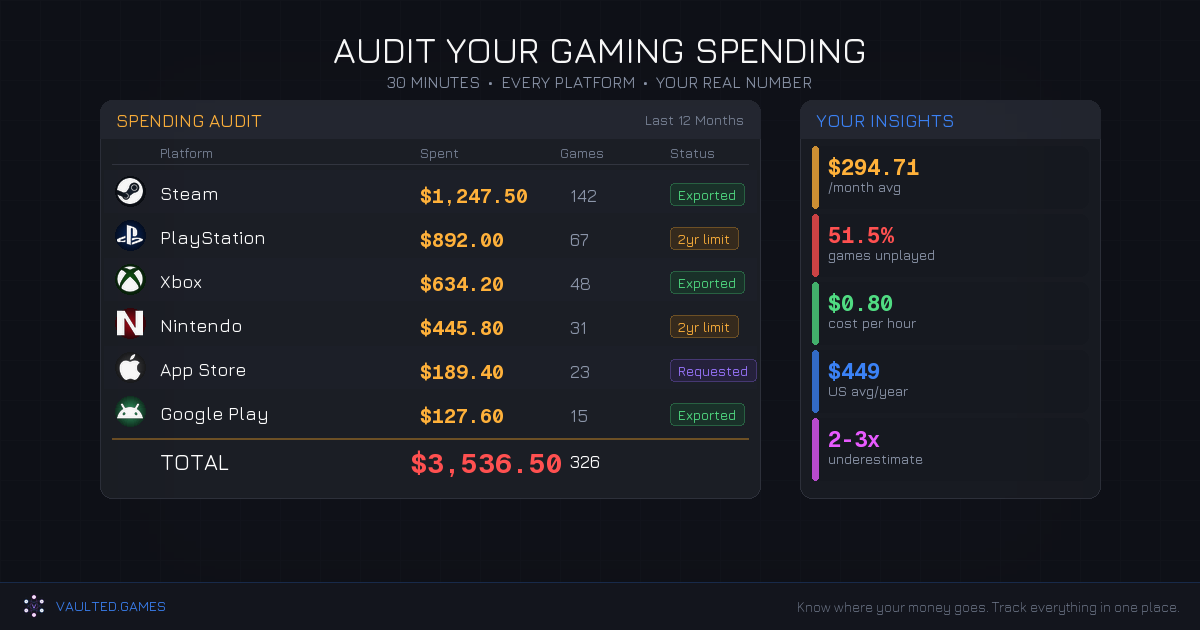
Most gamers think they spend somewhere around $150 a year on games. The actual average for American households is $449 per year, and that number still doesn't capture everything. Factor in microtransactions, battle passes, subscription renewals, and the occasional "it was only $5" impulse buy, and the real total climbs fast.
The problem isn't that you're spending money on games. Games are one of the best entertainment values out there at roughly $0.80 per hour. The problem is spending money on games you don't play, subscriptions you forgot about, and in-game purchases you can't even remember making. About 24% of purchased games never get played at all, and the average Steam library sits at 51.5% untouched.
So let's figure out your actual number. Every major gaming platform tracks your purchases, but none of them make it easy to see the full picture. This guide walks through each one, step by step, so you can have a complete spending audit done in about 30 minutes.
Grab a spreadsheet (or a notepad, whatever works) and let's get into it.
Steam: The Only Platform That Tells You the Truth
Steam is the only major platform with a built-in total spending calculator, and Valve buried it deep enough that most people don't know it exists.
Find your total spend:
Go to help.steampowered.com/en/accountdata/AccountSpend while logged in. That's it. You'll see three numbers:
- TotalSpend is the big one. That's every dollar you've fed into Steam.
- OldSpend covers anything before April 17, 2015.
- PWSpend is Perfect World-linked spending (CS:GO/Dota 2 related, usually $0 for most people).
Write down that TotalSpend number. Take a breath if you need to.
View individual purchases:
If you want the line-by-line breakdown, go to your Steam client, click your username in the top-right corner, hit Account Details, then View Purchase History. Every game, DLC, refund, and market transaction is listed with dates and amounts going back to your first purchase. Steam keeps everything forever.
Exporting your data:
Steam doesn't offer a native CSV export, but the Chrome extension "Steam Purchase History (CSV)" handles it in one click if you want the data in a spreadsheet.
What Steam doesn't track: Microtransactions purchased through a game's own payment system (not through Steam's overlay) won't show up here. Neither will Steam Market transactions if you're buying and selling items.
PlayStation: Two Years is All You Get
Sony's transaction history has the most frustrating limitation of any platform: it only goes back two years. If you've been on PlayStation since the PS3 or PS4 era, most of your spending history is gone from the interface entirely.
On PS5:
Go to Settings > Users and Accounts > Account > Payment and Subscriptions > Transaction History. Pick a date range and scroll through.
On the web:
Hit store.playstation.com, sign in, click your avatar, go to Account Settings, then Transaction History.
You'll see individual transactions with dates, amounts, and payment methods. PS Plus subscription charges show up here too. But there's no total spending number. You have to add it up yourself.
Getting older data:
For anything beyond two years, your only real option is searching your email inbox for receipts from "PlayStation" or "Sony Entertainment Network." It's tedious, but it's the only record that exists.
Exporting:
The Chrome extension "PSN Export Transaction History" can pull your visible history into a CSV, though it hasn't been updated in a while and may have compatibility issues. PSDLE (repod.github.io/psdle/) is another community tool worth trying.
Xbox: Best Export Option of Any Console
Microsoft actually does the best job here. The web portal keeps your full purchase history with no time limit, and it has a built-in export button. Novel concept, right?
On the web (recommended):
Go to account.microsoft.com/billing/orders. Sign in with your Xbox Microsoft account. You can filter by order type (Games, Apps, Subscriptions) and time range using the dropdown menus.
Export your data:
Look for the Export button near the top of the order history page. Microsoft lets you download your full history. This is the best native export option of any gaming platform, period.
On console:
The Xbox console itself only shows about the last 6 months. Always use the web portal for a complete picture.
Watch out for multiple accounts: If you have separate personal and work Microsoft accounts, purchases only show under the account that made them. Make sure you're logged into the right one. Game Pass games you played but didn't buy won't appear as transactions, only the subscription fee itself shows up.
Nintendo: The Most Limited History of Any Platform
Nintendo shares PlayStation's two-year cap and adds zero export options on top of it. For a company that's been selling digital games since the Wii era, this is pretty inexcusable.
On Nintendo Switch:
Open the eShop, tap your profile icon, and look for purchase history in your account section.
On the web:
Go to accounts.nintendo.com, sign in, go to Shop Menu, then Transaction History.
You'll see transactions with dates and amounts, but only from the last two years. No total calculator. No export.
For older purchases:
Search your email for receipts from @accounts.nintendo.com. That's literally the only way. If you bought games on the 3DS or Wii U eShop and didn't save those emails, that spending data is effectively gone.
Epic Games Store: Full History, No Calculator
Epic keeps your complete purchase history from day one, which is nice. But there's no total spending tool and no export option, so you're stuck scrolling and doing math.
On the web:
Go to epicgames.com/account/payment/history. Sign in, and you'll see every purchase, including $0.00 entries for free game claims.
The cross-platform blind spot: If you bought V-Bucks or other items through PlayStation, Xbox, or Nintendo (instead of directly through Epic), those transactions show up on THOSE platforms, not in your Epic account. This catches a lot of Fortnite players off guard. You can check V-Bucks spending specifically in Fortnite under Settings > Account and Privacy > View V-Bucks Spending.
Mobile: Where Spending Hides Best
Mobile gaming purchases are the sneakiest category because they're small, frequent, and spread across a lot of different apps. That $4.99 here and $9.99 there adds up faster than most people realize.
Apple App Store (iOS):
Open the App Store app, tap your profile picture, then Purchase History. It defaults to showing the last 90 days, but you can change the date range. For a complete history, Apple keeps everything going back to your first purchase.
If you want a full data export, go to privacy.apple.com and request a copy of your data. Apple will compile your full purchase history and deliver it within 7 days. It's the most thorough method, but it takes time.
Google Play (Android):
Open the Play Store, tap your profile icon, go to Payments & subscriptions > Budget & history. Google actually has a built-in budget feature here that tracks monthly spending against a target you set. It won't stop you from buying things, but the alerts help.
For exporting, Google Takeout is your best bet. Go to takeout.google.com, deselect everything except Google Play Store, and create an export. Your purchase history comes as a JSON file you can convert to CSV.
The Spending You Won't Find on Any Platform
Here's where the audit gets real. Platform purchase histories only capture part of the picture. These categories slip through the cracks and they're usually responsible for doubling (or tripling) what you thought you spent.
Battle passes are $10-15 per season, with new seasons every 2-3 months. If you play three games with battle passes, that's $120-180 a year just on passes. And a lot of games now sell premium tiers at $20-25.
Stacked subscriptions add up silently. PS Plus Premium ($159.99/year) plus Game Pass Ultimate ($19.99/month, or $239.88/year) plus Nintendo Switch Online ($49.99/year) is already $449.86 before you buy a single game. Add EA Play, Apple Arcade, or Humble Choice and you're well past $500 in subscriptions alone.
In-game currency is designed to hide spending. When you buy 2,800 V-Bucks for $19.99 and then spend them over a few weeks on skins and emotes, the original purchase fades from memory. The conversion layer between real money and fake currency is intentional. It makes you feel like you're spending "points" instead of dollars.
DLC and season passes turn a $70 game into a $120-150 investment, and they're often bought at launch when you're most excited and least critical about whether you'll actually play all of it.
Game upgrades and re-purchases are another quiet drain. Standard-to-Deluxe upgrades, cross-gen upgrades (PS4 to PS5), rebuying a game on a different platform because you wanted it portable on Switch. Each one is $10-30, and they accumulate.
The Bank Statement Method
The fastest way to get a complete picture (including all the stuff platforms don't track) is going straight to your bank and credit card statements.
Search your transaction history for these merchant names:
| Platform | Look For |
|---|---|
| Steam | STEAMPOWERED.COM, VALVE SOFTWARE, WL*STEAM |
| PlayStation | PLAYSTATION NETWORK, SONY PSN, SIE |
| Xbox | MICROSOFTXBOX, MSFTXBOX, MICROSOFT*GAMEPASS |
| Nintendo | NINTENDO, NIN*ESHOP |
| Epic | EPIC GAMES, EPICGAMES.COM |
| Apple | APPLE.COM/BILL, APL*APPLE MEDIA |
| GOOGLEPLAY, GOOGLE[App Name] |
A few things to watch for. PayPal transactions mask the actual vendor, showing up as "PAYPAL*[Merchant]" which makes them harder to spot. Gift card purchases from retail stores show up as Target, Walmart, Best Buy, or GameStop, not the gaming platform. And don't forget to check all payment methods, not just your primary card. A lot of gamers use different payment methods for different platforms.
Search for common microtransaction amounts too: $4.99, $9.99, $14.99, $19.99. These cluster around standard price points and can surface forgotten impulse buys.
Putting the Numbers Together
Now add it all up. Pull the totals from each platform, add in what you found on bank statements that wasn't captured by platforms, and write down the final number.
If the total is higher than you expected, you're not alone. Research shows 24% of gamers express regret over their gaming spending, and 32% of active spenders plan to reduce what they're spending. The psychology behind gaming purchases is specifically designed to keep you spending without noticing.
But knowing the number is the whole point. You can't manage what you can't see. Once you know where your money actually goes, you can make intentional decisions about it. Maybe you decide the spending is fine because you're getting great value per hour. Maybe you realize you're paying for two subscription services you barely use. Maybe you notice $200 in impulse buys you don't even remember.
Whatever the number is, it gives you a baseline. And from there, you can set budget goals that actually work and figure out strategies to play more while spending less.
Keep It Tracked Going Forward
The audit is step one. The harder part is not letting spending drift back to autopilot. A few ways to keep it visible:
Set calendar reminders to check your spending quarterly. 30 minutes every three months beats the surprise of an annual total that makes you sick.
Use Google Play's budget feature if you're on Android. It's the only platform with built-in spending alerts.
Export your Xbox data regularly since it's the only platform that makes it easy.
Track everything in one place. This is exactly what Vaulted.Games is built for. Instead of logging into six different platforms and doing math in a spreadsheet, you can track purchases, subscriptions, and spending across PlayStation, Xbox, Steam, Nintendo, and more in a single dashboard. It won't judge you for that $400 Steam sale haul. But it will make sure you can see it.